Overview
In addition to punch locations, your OnTheClock account offers security features to ensure accurate and compliant punching. These settings can be found in each employee profile under the Location & Security tab.
Methods for Clock-In Restriction
IP Authorization

-
Restrict clock-ins to a specific internet network.
-
Enforcement rules include:
-
Lock Out Employee – Employee cannot clock in unless on the designated network.
-
Warn Employee – Employee can clock in but will see a warning if not on the designated network.
-
Off – No restrictions.
-
-
Use Enforcement Type to allow multiple IP addresses (e.g., Multi IP Range).
Device Authorizations
-
Restrict clock-ins to a specific device.
-
The device must first be logged in to appear as an option.
Fingerprint Sign-On
-
Enable employees to clock in and out using fingerprints.
-
Options:
-
On – Employees may use fingerprints but can also clock in with other methods.
-
On, Fingerprint Only – Employees can only use fingerprint sign-on to clock in.
-
You can read more about setting up this feature.
Desktop or Laptop GPS
-
Record an employee’s GPS coordinates when they clock in or out from a computer.
-
This is for recordkeeping only; employees are not restricted to a location.
Mobile Rules and GPS
-
Restrict or track clock-ins from mobile devices.
-
Mobile Rule options:
-
Do Not Record GPS Coordinates – No location tracking.
-
Record GPS Coordinates – Records a location when clocking in/out.
-
Require GPS to Punch – Employees must share location to clock in/out.
-
Warn if Not at GPS Location – Employee is warned if clocking in outside a set location.
-
Disable Punch if Not at GPS Location – Employee cannot clock in unless at a set location.
-
GPS Tracking
Track an employee’s GPS location throughout their shift when clocked in.
Setup
web:start
IP Authorization
Step 1: Log in as an administrator or manager.
Step 2: Go to My Team and select the employee you want to restrict.
Step 3: Under “location & security,” toggle IP Authorization on.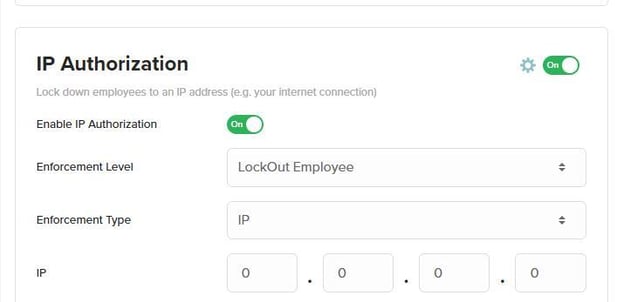
Device Authorization
Step 1: Log in as an administrator or manager.
Step 2: Go to My Team and select the employee you want to restrict.
Step 3: Under “location & security,” toggle “Enable device & browser authorization” on.
Step 4: Find the device in the list and toggle Allow Punching on.

Step 5: Click save.
Fingerprint Sign On
Step 1: Log in as an administrator or manager.Step 2: Go to My Team and select the employee you want to restrict.
Step 3: Under “fingerprint sign on,” choose “On” or “On, fingerprint only.”
Step 4: Check if fingerprints are on file.
Step 5: Click Save.

Desktop or Laptop GPS
Step 1: Log in as an administrator or manager.
Step 2: Go to My Team and select the employee you want to restrict.
Step 3: Under Desktop GPS Rules, toggle the setting On. 
Step 4: Click Save.
Primary Work Location
The Primary Work Location is the registered business address where the employee works.
-
It is required for payroll tax purposes but does not restrict employees.
-
To restrict employees, set up GPS Locations and follow the Mobile Rules & GPS guidance.
-
Multiple primary locations can be created and assigned per employee.
-
A location address is required to apply a primary work location.

You can have multiple primary locations, and assign them on an individual employee profile. In order to apply a primary location you will need to have a location address.
Mobile Rules & GPS
Step 1: Log in and go to My Team.
Step 2: Select an employee to open their profile.
Step 3: From the profile, go to Location & Security.
Step 4: Under Mobile Rules & GPS, toggle Enable Mobile Punch on.

Step 5: Select your Mobile Rule.
Step 6: Click Save Settings.
App GPS Tracking
Step 1: Log in and go to My Team.
Step 2: Select an employee to open their profile.
Step 3: From the profile, go to Location & Security.
Step 4: Under Mobile Rules & GPS, toggle App GPS Tracking on.
![]()
Step 5: Click Save Settings.
web:end
app:start
Mobile Rules & GPS
Step 1: After logging in, navigate to “Employees.”
Step 2: Select an employee to open their profile.
Step 3: From the employee profile, navigate to “Location & Security.”
Step 4: Under “Mobile Rules & GPS,” toggle “Enable mobile punch” on.
Step 5: Select your mobile rule.
Step 6: Click “Save settings”.

App GPS Tracking
Step 1: After logging in, navigate to “Employees.”
Step 2: Select an employee to open their profile.
Step 3: From the employee profile, navigate to “Location & Security.”
Step 4: Under “Mobile Rules & GPS,” toggle “App GPS Tracking” on.
Step 5: Click “Save Settings.”

Troubleshooting Authorization Errors
-
Unauthorized Browser Message
If an employee sees a message that they are on an unauthorized browser, it usually means their cache and cookies were cleared. An administrator must reset the browser as an authorized device. -
Unauthorized IP Address Error
If an employee receives an error that they are not at an authorized IP address:-
Confirm the correct IP address is entered in IP Authorization settings.
-
If you do not have a static IP, restarting your network may cause your public IP to be reassigned.
-
The system will display your current IP address under the IP Authorization setup screen so you can update it if needed.
-


app:end
Q&A
Q: Can a device accidentally become unauthorized?
A: Yes — clearing a cache, deleting cookies, or deleting the mobile app will deauthorize a device, requiring you to repeat the authorization process.
Q: What are the system requirements for IP authorization to be enabled and used?
A: IP enforcement will only work if you have cable, a T1 line, or a Static DSL internet connection. Standard DSL constantly changes IP addresses. Therefore, it will not work for IP enforcement.
Q: Why did my IP address change?
A: If your IP address is not static and you lose power or your internet connection, you may lose the IP address. If so, the IP address on file will need to be updated.
Q: What IP Enforcement type should I choose?
A: If your IP address is not static and you lose power or your internet connection, you may lose the IP address. If so, the IP address on file will need to be updated. “IP” is most commonly used and works best if employees work from one main office. “Multi IP Ranges” is the next most popular, allowing you to enter multiple IP addresses to create a list of authorized IPs for multiple locations for clock in/out.
Q: Can an employee deny app GPS tracking?
A: Yes — employees need to accept tracking for their devices to be tracked. Due to privacy, they can decline tracking.
Q: Can I set the frequency for breadcrumbs with app GPS tracking?
A: No —this is set to record every 200 meters and employee moves.
Q: I assigned a primary work location, and now I am receiving a "We're sorry message"?
A: If you assigned a primary location to an employee and are now receiving an error, Go to the locations in your account and make sure an address is attached to the location. Edit the location and toggle "address location" on. Fill in the details for this address, and toggle primary location on and save. For complete instructions click here.